

One of the challenges of earth-based astronomy is the fact that you are on the Earth. You are at the mercy of clouds, dust, atmospheric pollution, and indeed light itself.
The Hubble Space Telescope was launched into low Earth Orbit in April 1990 aboard the Space Shuttle Discovery and is expected to remain there until its orbit decays in the mid 2030’s. Viewing the visible and near-infrared spectra, the Hubble Space Telescope has enhanced our understanding of the universe over the 36 years it has been active.
This week, the LEGO Group has revealed ICONS 11382 The Hubble Space Telescope, a 1252-piece model commemorating the 35th anniversary of the orbital observatory. It will be available on August 1st, 2026, priced at $AUD229/ $USD139.99 / 129.99 € / £119.99. The set includes one minifigure.
The LEGO Group sent a copy of the set over for an Early review. Let’s take a closer look.
What’s in the box?
The set comes in a sizable cardboard box, and contains 9 paper bags of elements, as well as a polythene bag containing several lengths of pearl gold flex tube as well as a pearl silver ‘zipline’ element.
I was disappointed to see that the manual was not in its own envelope with the sticker sheet as well as the foil solar panel sheet. The fact that these arrived uncreased appeared to be due more to good luck, rather than good management,


The manual presents us with the obligatory history lesson, some notes from the design team, a timeline for the Hubble service missions and a diagram showing which part of the Hubble is represented where in the model.


The Elements
The nine bags of elements do not contain many new elements. The standouts of the flex tube and zip line elements, along with the Brick 4×6 with outside bow (Design ID68522) in medium stone grey. This element has also been printed to provide the faces of up-scaled minifigure builds. The set contains a lot of black and medium ston grey- especially 2x3x2 curved elements. We have curved tiles and plates, as well as a few SNOT elements that seem to be coloured so that we don’t lose orientation.


The set contains 3 printed transparent panels, representing some of Hubble’s major finds: The Butterfly nebula, the Pillars of Creation, and the Whirlpool galaxy. I appreciate that the original images extend beyond the LEGO Colour palette (Fun Fact: Printing on LEGO Elements is limited to the colours available in the modern colour palette which, while fairly impressive, does not cover every hue present in the original images.)


The Minifigure includes several new prints, including a 2×3 tile that attaches via a special bracket to feature as the EVA suit. This tile features the Hubble 35th anniversary logo.


The Build
We start the build with a Technic-based stand. It’s simple and gets covered up with system bricks, along with the printed transparent panels. A name plate – stickered – is attached. The sticker covers the central injection point in the 6×6 tile, so it actually tidies up the appearance, despite the intrinsic challenge in getting it properly straight.

We start work on the base end of the telescope, where the scientific instruments, including the Space Telescope Imaging Spectrograph, the Cosmic Origins Spectrograph, and the Advanced Camera for Surveys, are located, along with the Near Infrared Camera and Multi-Object Spectrometer.

Our next level houses the gyroscopes around the periphery, along with the fine guidance sensors – although the details here are likely lost, unless you are looking at a guide to the telescope itself.
In the center of the disc that makes the guidance sensors is a wide field camera (in fairness, a simple 2×2 round tile, sitting underneath the 6×6 transparent dish which functions as the primary mirror, covered by the central baffle.) We add some curved slopes to fill in the wall, flanked by some angled bricks, to widen the diameter of the circle, and smooth the angle between curves. We tuck the first flex tube into place.


We fill in the falls around the mirror and other instruments. Some golden arrows serve to hold on a panel decorated with some low-key greebles in place. It is easy enough to remove in order to move look inside this lower section,


We build up the barrel of the telescope. I was delighted by the technique of joining spaced SNOT Bricks using the two-module-long connector bar. It adds a classy, detailed look without too much effort.


We build up by adding a quarter-circle panel. The secondary mirror is held in place here, with studs on three of the 4 arms.


We build up the telescope barrel, with panels snapping into place around the secondary mirror. I appreciate the way the mirror itself helps stabilize the rounded modules. There is some subtle texturing on the walls, but empty clips leave me wondering if they might be waiting for some more bling a little down the track. The panels are spaced at the upper end with a combination of SNOT Bricks, connecting to the next panel, along with some arches adding further stability. The panels are edged off with golden handles. Just right for an intrepid repairman to latch onto while performing repairs and upgrades (these service missions are cataloged in the instruction manual).


Great Golden Greebling
We add the aperture door at the upper end, then start adding a number of golden greebles around the model. We have already added the flex tube and handles, but check out the detail provided by these golden revolvers!


Pearl gold tiles and bars are added, all helping to break up the grey surface of the telescope
We decorate the bottom of the telescope by wrapping the zipline around various elements on the base to demonstrate hoses or wires.


Finally, we built the solar panels: relatively simple frames made of Technic elements (I forgot to photograph these elements after the Knoller in Chief laid them out. The foils are secured to the framed using plates with vertical bars. They slot into some spaces around the junction of the base and barrel, and can have theire angle adjusted however you wish.


The panels can be easily rotated, thanks to the friction pins. If I were to add any sort of play feature in this set, It would be a lever to rotate the panels in unison. However, I imagine any such mechanism might overcrowd the telescope’s internal details.
The Finished Model
The final model has the option of opening the aperture, upper barrel, and lower barrel, holding the primary mirror.


I quite like the final display model. It will stay on my shelves for a while. But when you are ready to tuck it away, it all fits back in the original box:


Gallery
I couldn’t help but take the Hubble outside on a crisp winter’s evening.


My thoughts.
The Hubble Space Telescope has played a vital role in developing humanity’s understanding of the universe. Over the past 35 years it has captured some timeless images.
This model is the largest version of the Hubble to be produced to date, having been included otherwise in two models of the Space Shuttle Discovery (7470 and 10483), as well as the LEGO IDEAS Women of NASA, with a minifigure of Nancy Roman who was part of the team that lobbied for the Hubble Space Telescope’s development.

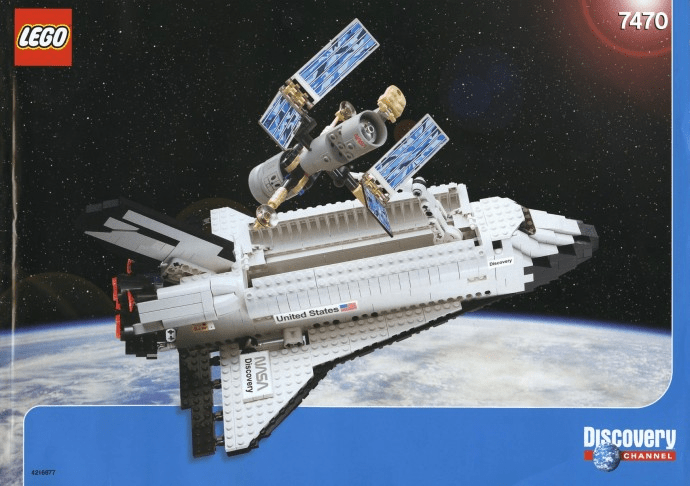
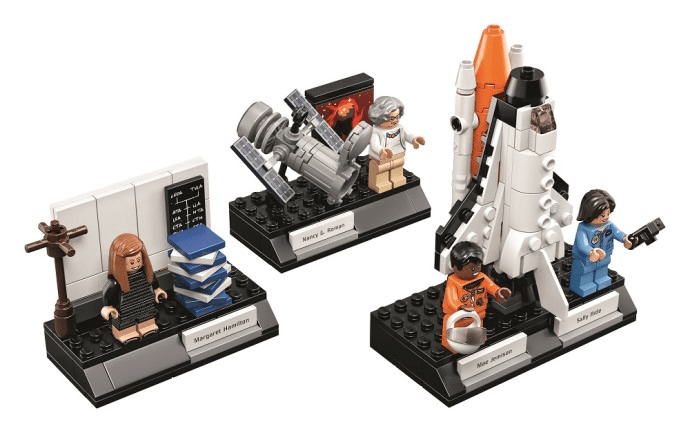
While the model features grey rather than the reflective silver of the actual telescope, and the muted tones of the pearl gold, this allows for more internal consistency than would be possible if the metallic gold was used for the bricks: all gold elements are be the same shade – it would not be possible to have the flex tube produced in the metallic gold colour at this time in history. Silver ink had a recent outing with the Mandalorian N-1 Star Fighter: I do wonder what effect it might have had on the price to use this colour for the telescope itself.

I also appreciate the subtle way in which greebles are used to decorate the surface, breaking the grey with shots of gold. It certainly provides a few useful lessons in designing greebles for my own builds. The greebles take a long stepped grey cylinder, and make it into an interesting build, with greater display value.
There are some neat tricks incorporated in the building. I appreciated the connector bars joining bricks with studs on their side, as well as the angling of some panels to expand the size of the circle on the lower section of the telescope.
I would have like to see the instructions, along with the stickers and foils included in a seperate envelope: the sheets are certainly vulnerable to damage in transit, and I am sure it won’t take long for this to be an issue for someone.. LEGO Customer service will be your friends.

This model is a ‘minfigure scale’ version of the Hubble, and so I am glad the figure is included for scale.
Finally, I love the fact that the set can be packed back in its box when you are looking to give it a little time off display.
Overall, this set appealed to my inner space fan. Celebrating 35 years of Hubble’s time in space, the set is a reminder of the halcyon days of the Shuttle program and the ways in which we have a better understanding of the universe. The model provides interesting building techniques, as well as providing an insight into the Space Telescope itself. I happily give the set four out of five Arbitrary Praise Units.
Do you like this new larger scale of the Hubble Space Telescope? Have you built any of the previous version? Leave your comments below.
LEGO ICONS 11382 Hubble Space Telescope has 1252 pieces. It will be launched for sale on August 1st, 2026, priced at $AUD229/ $USD139.99 / 129.99 € / £119.99.
This set was provided by the LEGO Group for review purposes. All Opinions are my own.
If you have enjoyed this post, please feel free to share it with your friends, families and communities. You can also keep up to date with us by following The Rambling Brick on our socials: Facebook, Threads, Bluesky, Tumblr (or just sign up for our mailing list) and find some extra content on Instagram and TikTok.
We really value your feedback: please let us know what you think about the sets we review, and the articles we post. And if you wish to support the Rambling Brick, consider clicking on our affiliate links before going shopping at LEGO.com. The Rambling Brick receives a small commission, and it costs you nothing extra.
Until Next Time,
Play Well!


![Cracking set, Gromit! [21371 Wallace and Gromit revealed]](https://ramblingbrick.com/wp-content/uploads/2026/08/Untitled-30-August-2026-at-22.27.48.jpeg)
![Building LEGO® Worlds – Create the Worlds You’ve Only Imagined – [Book Review]](https://ramblingbrick.com/wp-content/uploads/2026/08/Untitled-30-August-2026-at-23.51.37.jpeg)
Leave a Reply