LEGO Alive!
So, last week I wrote about my memories of my introduction to LEGO Technic, which was way back in 1978. Over the recent Easter weekend, I had the chance to visit my childhood LEGO collection. I found some Technical set instructions in the mix: 8860-Car Chassis, and 856Bulldozer. But not for my original helicopter. Then I found the sheet you see here: preserved after 40 years. Not the instructions for the Helicopter, but for the B-Model airplane. I turned them over, and on the flip side were blueprints for the helicopter, at a 1:1 scale.
Now, we ended up owning a fairly broad collection of LEGO for the 70’s-80’s: lots of regular bricks, ancient wheels and parts from 3 significant technical sets (as well as some supplementary sets). I thought to myself: there is a high probability of locating enough parts to put the helicopter together. Perhaps not colour perfect, but structurally so.
And so I set to work…
Now this is an interesting collection: it is partially sorted… at least the technic elements are. Most of the regular blocks are stored wrapped up in a sheet, in a box: the advantage of this is that they can be readily sorted on the floor: open out the sheet, rummage, close up the sheet. Just like when I was 8.
So, with the sheet, some semi sorted trays and an iPad loading up the peeron.com instructions, I set about my business.
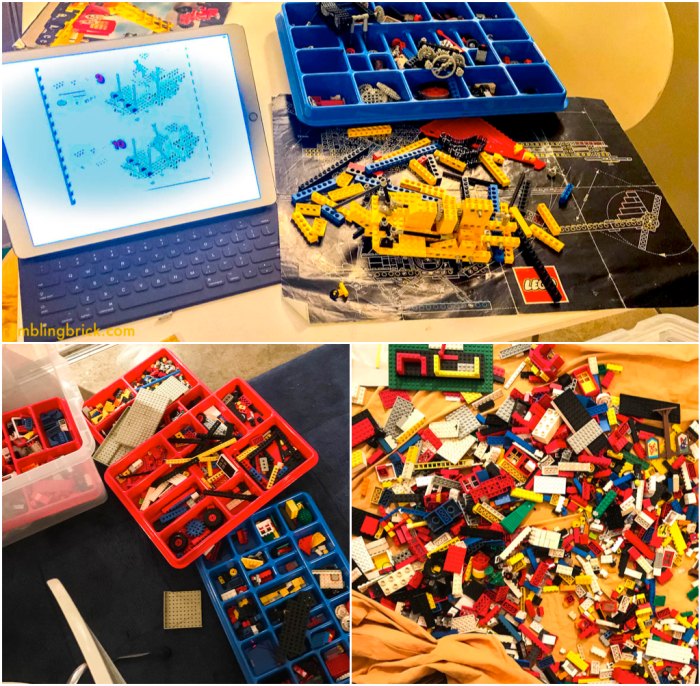
The first thing that struck me was that although it was pretty radical in its time, the construction uses a lot of regular LEGO® system elements and techniques, just with holes in many of the bricks allowing the attachment of rivet type connectors. I was able to identify the majority of elements without too much drama. 1×1 square plates were probably the hardest to locate, as they were not as plentiful forty years ago as they are now. As the build progressed, it became apparent that four of my 1×16 technic bricks in yellow had gone missing, so I substituted black bricks in their place. The car chassis 8860 will never get built as long as I have this reconstruction built up. I was surprised at the number of steering wheels that were intact in our collection, as they always seemed to be amongst the first pieces to break, closely followed by the 8 tooth gear: one and a half studs in width, and the piece most likely to protect Mum’s foot by allowing itself to crush rather than embedding itself into her bunion!


Instructions:
Any challenges I experienced with the instructions had nothing to do with the online access of scanned images, or indeed poor colour definition in the images. Both of these things were fine. It was the way in which older instructions would place multiple pieces on the model, with several of them obscured in each step. There was no guarantee of symmetry, and the majority of images were drawn from the same front/ 45º up, 45º off to the left. Never mind that the obscured right hand rear corner was where all the action was occurring. This added a degree of excitement you don’t typically experience with modern building techniques: while the elements were listed for each step, it was not always clear as to where they were placed, and I would often find myself completing the placement of parts for one step some time later, after discovering a significant structural irregularity.
Construction started with the base of the helicopter around a frame of technic bricks, covered with plates of various shapes and sizes. then we set about work on the engine, and central frame of the helicopter. Plates after every brick suggesting that medium sized cogs needed two studs between them to mesh nicely: these days, technic elements are essentially square in their profile, rather than the 2.5 plates by 3 plates we see in a 1xn brick. A complicated mechanism for a control in the cockpit to change the pitch of the rotors put up a bit of a fight with regard to how it would best function: Levers, pivoting axels, pivoting bricks in order to raise a brick… you get my drift.


On more than one occasion, I went back 5 steps and substituted a correctly sized plate or brick, or relocated it one stud to the left, as it became obvious that what I had attempted was not going to work. I am now less scathing in my thoughts of contemporary sets only having one or two pieces added per step, with additional angles to ensure the step is clear for all to see!
The project took around three hours to complete. All of the required substitutions were on the basis of colour only. And many of these were 1×2 slopes, inverse or otherwise. It turns out that a lot of our place 1×2 slopes have gone missing.
Functionality
There are two major play features of this helicopter. Turning the wheel located on the left-hand side of the fuselage turns both the main rotor and the tail rotor. The levers in the cockpit are used to adjust the pitch of the rotor. This variable angle is the feature that allows real helicopters to hover. This is done in a way that does not use any tiles to prevent the rotors from catching: the rotors are stabilised by central axle and the base consists of a plate which has been inverted. A bracket made of a plate with holes in, and bricks down the side, was attached by axles to the pitch mechanism this moved the pitch mechanism, which was directly mounted on the rotors. This was a revolutionary way to approach this problem in its day: what kind of build involves placing bricks directly upside down on normal bricks??!!


The rotor mechanism was not smooth, but as you can see from the pictures, elements were not clean, and a lot of dust was around to be seen, and perhaps not all bricks were placed as firmly as they could have. Of interest was the way that one plate seemed to lose all clutch power – preventing any brick from staying in place anytime the vehicle was tipped over.
This was a very satisfying build to complete: it bookended the week nicely, giving a feeling of completeness to last week’s discussion.
I do not feel compelled to rebuild the Bulldozer or Car Chassis 8868 – Part of this is the challenge in locating old school piston heads and other pieces that have not lasted the years. And it was not as special experience for me, nostalgia wise as 852. This was the set that introduced me to the joys of mechanisms, and multiple moving parts.
I give this rebuild a 3.5 out of 5 arbitrary praise units: the shape is satisfying, as are the mechanisms. The construction experience felt unnecessarily challenging – perhaps I was tired, perhaps I was ham fisted, perhaps I got excited and rushed – but it was too easy to misplace elements and produce complications down the road. I loved the color blend in this set: the primary colors were so vibrant, and reminded me of a simpler color palette. Having revisted the old style Technical Sets, I look forward to experiencing more of the current crop – I am interested in getting a better feel for the elements available and the way they work together.
And to put together the 40th anniversary tribute to 8868…
In the mean time: Play Well!

